With built-in XML editor, a bit of grey hair, and slight headache you will learn to create a kind of layers effects in Inkscape to apply same SVG filter to all a objects of a layer in your drawing.
In the very unlikely case you don’t know Inkscape, this is a great vector graphics editor in the lines of Adobe Illustrator, Corel DRAW, Xara Xtreme, ACD Canvas and so on and so forth (all trademarks respected). It’s completely free and runs on Windows, Linux and Mac.
The application uses SVG, which is a W3C standard for vector graphics and animation supported by all major web-browsers (amazingly including upcoming Internet Explorer 9) and a number of drawing tools (Adobe Illustrator and Corel DRAW again, but also Microsoft Visio).
This tutorial presumes having Inkscape 0.47 around and explains a truly horrible trick with Inkscape’s internal XML editor. The trick [was invented](https://web.archive.org/web/20171013215412/http://www.inkscapeforum.com/viewtopic.php?f=5&t=4324 by kelan of inkscapeforum.com and logically enhanced by the ingenious Ivan Louette, same URL. What I do here is basically explaining things in details, providing illustrations etc. Thus, if you want to praise authors, do it at inkscapeforum.com, but if you wanna swear, be my guest.
Okay, if you took a time to read the SVG page, you know that it is based on XML, and that means that SVG is extendible. Which is exactly what Inkscape developers did, so the application uses a superset of SVG: standard SVG elements plus some limbs of its own.
For example, SVG specifications doesn’t cover layers, so layers in Inkscape are just groups of objects that have an extra ‘inkscape:groupmode’ attribute whose value is ‘layer’. Inkscape supports several blending modes for layers, and all of them are implemented using SVG filter primitive called feBlend.
What’s there for us? Well, it means that since any blending mode other than Normal is a filter, why not use any filter in its place? That way we can basically achieve layer effects, so that any object of a particular layer would have same SVG Filter applied to it. Isn’t it lovely?
Let’s see how it works.
- Start with two layers: “no filter” and “has filter”. Assign Multiply blending mode to the “has filter” layer:
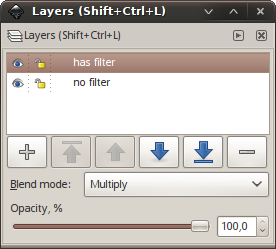
- Press
Ctrl+Shift+Xor go for “Edit > XMl Editor…” to open the internal XML Editor. In the left part of the dialog where document tree is unfold svg:defs to discover the SVG filter element that contains just one feBlend primitive:

- And now unfold “layer” element to look at how the filter is referenced there:

Got it? So, what you needs is just create a new SVG filter and add a style attribute with “filter:url(#filter14319)” value to a layer that references to ID of the newly created filter. Ready to try? Let’s go!
-
Switch blending mode of “has filter” layer to back to Normal. The unused filter will be automatically deleted.
-
In the very same “has filter” layer create a new object. Anything will work. I’m using a rounded rectangle here:

- Apply some filter to this object. Something like Smooth Shader of Non-realistic 3D shaders will work just fine:

- Fire up XML Editor to find the new filter and copy it’s ID to the clipboard.
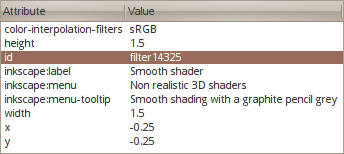
- Go to the layer’s node and create a new attribute called style. Add a reference using ID from clipboard as illustrated below:
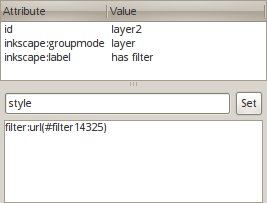
- Press the Set button to apply your changes.
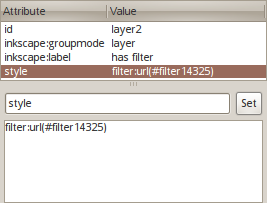
- If you look at the drawing at this point, you will see that the rectangle has become diminished. This is because the filter has been applied twice to it. Do you still remember that layers are actually groups which contain all objects inside those “layers”?

- So just use “Filters > Remove Filters” command to fix it up:

- We are done! You can pick any drawing tool and try creating some new objects in the “has filter” layer:
Voila! All new objects automagically have a shared SVG filter!
Of course all these arbitrary objects are nothing but quick and dirty illustration of the basic principle. What you might like to use it for is e.g. creating consistent shadows for objects in a website design. In that very case you will need to do the following:
- In case a shadow repeats the original’s shape, create a linked offset (from Paths menu) for every original object.
- Create all the other shapes that will contribute to shadows.
- Move all linked offsets and arbitrary shadow shapes to a dedicated lower layer.
- Repeat the trick explained above.
Now to consistently adjust shadow you only need to open SVG Filters Editor (“Filters > Filter Editor”) and change displacement (presumably you shift a shadow from the original object) and blur values.
Dream #1: I wish I could control rounding of rectangles the very same way!
And the last bit, revealed by Ivan Louette. What do you think will happen if you change blending mode of a layer after all this tinkering? That’s right: a new filter will be created and it will contain just an feBlend primitive, thus sending the carefully created and referenced filter to those great big vector meadows up in the sky (or you can undo).
This is why as soon as you go for a layer effect, the only way to change blending mode is to manually add an feBlend primitive to the primitives stack of an existing filter. How exactly?
Let’s have a good look at the second screenshot. Do you see that the second input (in2) uses BackgroundImage? That’s right. All you need to do is adding feBlend to the very bottom of the primitives stack and connecting the second (lower) input to Background Image (the first input will be connected to the previous primitive).
Dream #2: and now I really-really want a no-brainer user interface for all that. Oh, and a pony!
Patreon subscribers get early access to my posts. If you are feeling generous, you can also make a one-time donation on BuyMeACoffee.
