How to create lens distorsion models with Hugin
by Aleksandr ProkudinIf your lens is missing in the LensFun database, you can create it with Hugin's lens calibator
If your lens is missing in LensFun database, you can create it thanks to lens calibration app from newly released version of Hugin, a free panorama stitcher. Learn how to do it.
The by far most popular library for fixing lens distorsion is LensFun which relies on panotools model. It’s used in darktable, Rawstudio, digiKam, UFRaw and other digital photography apps for Linux. It works quite nicely, but the lens database isn’t exactly complete, and there is no dedicated user interface to create new entries for this library. Which is why Andrew Zabolotny, principal developer of LensFun, suggested to everyone to just use Hugin.
Hugin lens calibration app is, therefore, a first step in the direction of providing such a user interface. Download Hugin here, build it, if you are on Linux, and run Hugin Calibrate Lens application. Here is how it works.
First of all, if you need to create a new or better (since some lens descriptions are very simplistic) lens distorsions model, you need a set of images shot with different focus distance (if it’s a zoom lens). It can be a printed grid target shot from close distance, or a photo of a building with prominent horizontal and vertical lines.
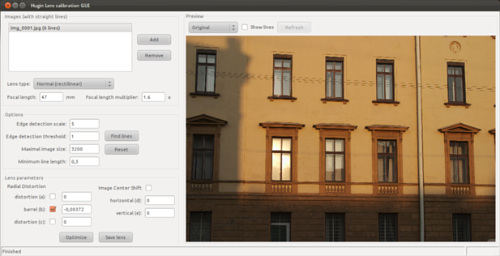
You have to be careful about initial yaw, pitch and roll of the lens, because it’s all about detecting horizontal and vertical lines. The image below is, for this very reason, a somewhat poor example, because it has crippled horizontal perspective. You can fix horizontal keystone in e.g. darktable, but then it’s not a clean lens model anymore. Edit: Bruno comments below that this is actually not a big deal.
It’s best to have several images loaded for better precision, but let’s go for just one in this case.
In some rather rare cases the application won’t read focal length and crop factor from Exif. You can easily fix it by setting those manually:

Once you have it loaded and set, you need to find a good combination for edge detection which is how the lens calibration app figures out what the horizontal and vertical lines of an image are. The principle is that the higher edge detection scale and threshold values are, the less edges you get.

Press Find lines button to run lines detection. Then you can switch to edge detection display mode in the top toolbar. This mode is easier for evalutation of detected lines. Here is what it looks like:

If some of the detected lines aren’t good enough, single-click on them to mark them for exclusion from calculations. Clicked lines become red:

When you think you’re done, click Optimize button in the sidebar to calculate a, b and c values for panotools distorsions model.

To try how it works you can switch display mode to Corrected and see if it works well. If it does, the next step is to create a new XML file in a text editor and copy the calculated values there, then save the file and send it to Andrew for inclusion in the next version of LensFun. Andrew provides a rather detailed manual on creating XML files for LensFun database. Please refer to it for details.
When it’s done, you can locally patch an existing database. The XML files of the database are stored in /usr/share/lensfun/ directory on Linux. Then your digital photography application will pick the updated database and will be able to fix distortions for your lens.
Patreon subscribers get early access to my posts. If you are feeling generous, you can also make a one-time donation on BuyMeACoffee.