How to save and restore selections in GIMP
by Aleksandr ProkudinLearn how to save a carefully constructed selection for elate ruse in the project
Sometimes during work on a complex project in GIMP you carefully construct a very precise selection you might need later, but just now you have to switch to a different layer and do something else. So how does one go about saving and restoring selections for later use? It’s actually very easy.
This GIMP tutorial explains two ways to do it and discusses their pro and cons.
Saving selections to channels
GIMP has three intertwined concepts: selections, channels and masks. Among them, channels are taking a central position, the other two are built on top of them. Every time you work on a selection or a mask you actually work on a channel — it’s just nicely abstracted away. Let’s see how it works on a fairly simple example: a rather monotonous background and a well standing out object in foreground.

Well, not an object in this case, clearly, but an actual human being.
So, say we pressed Shift+Q to enable a quick mask (we’ll talk of selections in a different tutorial) and did a quick and dirty selection using a feathered brush:

As you can see, in the Channels dialog a new channel called “Quick Mask” pops up and contains our selection. As soon as you press Shift+Q again to disable quick mask, the channel disappears, and the image gets a common “marching ants” selection marquee.

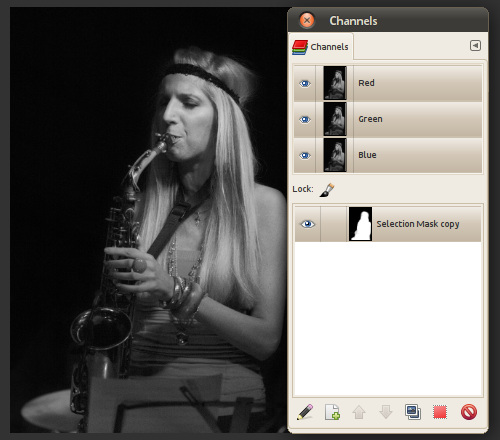
See? The selection is a channel really. So how about converting a selection to a channel explicitly? Easiest way to do it is using Select > Save to Channel command:

The selection will be preserved, but a new channel in the Channels dialog will appear with a name “Selection Mask copy” (see it again? selections, channels and masks).

It works vice versa even easier: to restore a selection from a channel just select a channel and click this button in the bottom toolbar of the Channels dialog (or use contextual/right-click menu):

By default this will replace any existing selection with a new one restored from your custom channel. But you can use modification buttons to do boolean operations with an existing selection: Shift will add to existing selection, Ctrl will subtract from it, Shift+Ctrl will intersect existing and new selections. In other words, it works just like everywhere else in GIMP.
Unlike the temporary quick mask channel that paints transparent red over the image, this channel is invisible by default, but is preserved and, which is even nicer, is saved to GIMP’s native XCF files. You can keep as many custom channels as you wish, across sessions. You really can.
So you can save all selections you might later need into channels and restore them whenever you want to. And since there can be dozens of them, you can double-click them in the Channels dialog and give each some new meaningful names.
There is one last thing it’s useful to know about channels. When you click an eye icon in the Channels dialog to the left from a channel, GIMP renders that channel on top of the whole image (it’s exactly what it does when you enable a quick mask). That way you can preview selection you once made. It’s a really handy feature, especially when you have lots of custom channels all close to each other.
But sometimes channel’s color matches color of a large area in an image, and thus when you preview the channel you might feel lost. Our simple case above is a great example of that. Have a look yourself and tell me if you don’t feel like squinting to figure out what area the channel covers exactly, because I bet you will:
But hey, you can easily fix that by changing color of a custom channel! Right-click to open contextual menu and choose topmost menu item called “Edit Channel Attributes”.
In the newly opened dialog you can click the preview rectangle to pick a different color and change opacity, should you really want to do that.

Does it help? Oh yes, it does:

As you can easily guess, since we are talking about channels, the very same trick will work for quick masks. That will come in handy for cases when there is a lot of red in an image. Say, you are so unlucky that you have to select embossed paintings on a red-brick Tibetan monastery wall:

Given that edges of paintings are not exactly even, after using polygonal lasso you will have to use feathered brush quite a bit to get the selection nice and clean, and this is where close red hues of the quick mask and the bricks will get to you.

So all you need to do is choose a different hue for the quick mask the way explained above, and suddenly epilepsy caused by lots and lots of red doesn’t trouble you anymore. Oh, and it’s easier to select too:

By the way, if you selected a different color for a custom channel, this will be saved into XCF and thus preserved across sessions. For quick masks however the custom color will be preserved only within current session.
OK, that’s about it regarding channels. Let’s move on to paths.
Saving selections to paths
A very nice thing about GIMP is that it does a very reasonable conversion of selections to Bezier paths, not just paths to selections like you could expect.
Supposing some kind person felt generous and threw you a bone which you immediately gnawed selected and outlined using Select > To Path menu item or the respective button in the Paths dialog:

(By the way, if you want some serious voodoo, try clicking the Selection to Path button with Shift pressed.)
The resulted path can be both edited as, well, Bezier curve, and converted back to selection using this very familiarly looking button:

Storing selections as paths has several benefits.
If you moved the original layer in your further edits after creating a channel from selection, you will have to restore selection, move it to match new layer’s position, then save selection to channel again to match current state of affairs and, finally, remove the old channel that is no longer needed. With paths you only need to shift a path and then you just create a selection from it, no need to cleanup anything.
Another benefit is that each path is saved with XCF file, can be exported to SVG (supported by Inkscape, Adobe Illustrator and Corel DRAW), and if you export the whole project to TIFF, every path is saved as clipping path and can be read by applications like Scribus and Adobe InDesign.
There is a drawback too, however: feathering (the bone was chicken’s) isn’t preserved when you save selections as paths.
Selection editor
As a matter of fact there is a dockable dialog in GIMP which this article could be started from:

As you can see it combines a selection preview and buttons for saving inverting and removing selection, as well as converting selection to channel or path or stroking a selection.
Personally I’m not quite convinced of the dialog’s usefulness, because most important commands can be assigned a shortcut, and the rest can be done from menu, so not much reason for another floated or docked dialog to me. But YMMV.
Conclusions
Let’s have a short round of TL;DR.
- Channels are best when you need preserving feathering and easy graphical preview of a saved selection.
- Paths are best when you need mobile layers/selections and advanced compatibility with other applications.
If you have questions, please just comment.
Patreon subscribers get early access to my posts. If you are feeling generous, you can also make a one-time donation on BuyMeACoffee.