How to install and manage GIMP addons
by Aleksandr ProkudinThis is the ultimate guide to installing and managing GIMP brushes, plug-ins, and scripts
Beginner users of GIMP seem to have a standard set of questions about add-ons for GIMP: what is supported, where to get more, how to install, what is the difference between scripts and plug-ins, why Python scripts are actually plug-ins and so on. This article is a kind of ultimate guide to GIMP add-ons for people getting accustomed with the application.
The screenshots are from development GIMP 2.7 version, but the material is applicable for the current stable v2.6.
What kinds of add-ons exist
So what add-ons can you install for GIMP?
Brushes
GIMP currently supports four types of brushes:
- Native static bitmap brushes (
.gbrand.gbh). They are very simple and very popular. - Native procedural brushes (
.vbr). Can have the shape of ellipse/circle, rectangle/square or star, with varying hardness, aspect ratio and so on. - Native animated brushes (
.gih). There are still quite a few of them in GIMP these days: Sparks, Grass and Chalk, for instance. In short, they are a bit like GIF animation: different bitmap images are used in a cycle as you keep painting. - Adobe Photoshop brushes (
.abr). Most versions of this file format are supported, multiple brushes from a single file will load just fine, but information about brush dynamics in ABR files is currently not used.
Since GIMP’s model of brushes and Photoshop’s model of brushes are rather different, GIMP dissects ABR files, so that every brush originally coming from a single file is represented separately:

Note the “-016” number after a name of an ABR file for the currently selected brush.
Gradients
Currently GIMP supports only gradient definitions from SVG images and its own gradients file format (.ggr) that is far more complex than e.g. Photoshop’s gradients. For example, it allows switching between various functions for blending between gradient segments which is desirable to achieve really complex and unique transitions between colors. Please refer to related part of the GIMP’s user manual for details.

Adding support for Photoshop gradients (.ggr as well) is possible. For conversion options please refer to “Conversion” section of the article.
Patterns
Natively GIMP supports GIMP’s own patterns file format (.pat) that has a limit of 512×512px size, as well as PNG, JPEG, TIFF among other file formats that are supported by gdk-pixbuf (a GTK+ own image library). Contrary to GIMP’s .pat for gdk-pixbuf supported file formats the limit doesn’t exist. However you can install ps-pat-load extension by Eric Lamarque. Since GIMP currently doesn’t allow extensions to load resources as resources, this extension makes it possible to open Photoshop patterns (.pat as well) as images, and if such a pattern has multiple patterns inside, all of them will be loaded as layers of one image. Here is what it looks like:

For conversion options please refer to “Conversion” section of the article.
Palettes
Palettes, also often referred to as swatches, are collections of flat colors, named or not named.
GIMP supports the following types of palettes:
- Native file format (
.gpl) - Paint Shop Pro color palette (
.pal) - Microsoft’s RIFF palettes(
.palas well) - Adobe Photoshop Color files (
.aco) - Photoshop Color Table palettes (
.act)
GIMP’s own file format, .gpl, turned out to be rather popular: it’s supported by many free graphics applications and despite of being RGB-only is a kind of lingua franca for free graphics applications.

For conversion options please refer to “Conversion” section of the article.
Fonts
This is usually not recommended, but you can install some additional fonts just for GIMP. Some people do it so they don’t have to see all possible fonts available in non-design applications like word processors.
As much as it’s highly subjective, a more flexible way is to use font managers that allow much more than just temporary enabling and disabling particular groups of fonts. There’s a nice selection of font managers on Windows and Mac, both commercial and free. On Linux there are two currently active projects: Fontmatrix and, um, Font Manager :) Reportedly another currently inactive project, FontyPython, works nicely as well.
Scripts and plug-ins
A lot of additional functionality is provided thanks to scripts and plug-ins. The difference between the two can be a bit puzzling for inexperienced GIMP users, but there is nothing really so scary about it.
Scripts are little programs that are mostly used to automate execution of routine tasks. They are a bit like Photoshop actions, but written manually (which is not so good) and can be interactive (which is excellent). By far most popular scripts for GIMP are written in Scheme (or, rather, in a Scheme dialect called Script-Fu) and have .scm extension. Here is an example of a typical Script-Fu dialog.

Scripts currently do not have preview, so if you got something wrong, you will have to undo, open the dialog again and redo it.
Plug-ins are a quite different. Whereas scripts can only use the functionality available in GIMP itself, plug-ins can provide entirely new features: filters, metafilters, file format loaders and savers and so on and so forth. For example, GIMP doesn’t have recently trending wavelet filters yet, but some of such filters are available from third party developers (denoise, sharpen, decompose). Likewise RAW images are supported in GIMP thanks to UFRaw which can work as a GIMP plug-in.
Whereas scripts are written in so called interpreted languages and thus run on any major platform as-is, most GIMP plug-ins are written in C and thus have to be compiled for every target operation system.
Python scripts are a very special case. While Python is an interpreted scripting language, Python scripts are actually considered by GIMP as plug-ins and thus should be installed to same location where compiled plug-ins are. Currently Pythons scripts do not have preview either, but this is bound to change.
It is also possible to write scripts for GIMP in other languages like Ruby (a standalone project), as well as write plug-ins in all languages supported by Mono platform (C#, Nemerle etc.) which is possible thanks to gimp-sharp project.
Modules
Modules are very much like plug-ins except that they integrate into UI somewhat tighter. There are very few third party GIMP modules, I can immediately think of just two. The first one is a color selector by Y. Fujii that works in LCh color space (CIE LAB in polar coordinates).

As you can see it just adds itself to the list of core GIMP’s color selectors.
The second third party module is an advanced softproofing display filter by Yoshinori Yamakawa. You can read more about this module here.
Themes
Themes are description of basic things in GIMP’s user interface like icons it uses, a font it uses for the interface, padding between user interface elements and suchlike (we’ll talk about GIMP’s UI customization in another article, at length). They are another uncommon kind of a GIMP add-on. So far I’ve seen just two additional GIMP themes, both of them are unmaintained (for years and years) and don’t match the existing set of tools.
Anything else worth mentioning?
Least known, additional GEGL operations can be installed as well. Right now there are very few around, but with ongoing work on further GEGL integration it’s bound to change. If you find some, on Linux it works like this: you copy. .c files to ~/.local/share/gegl-0.1/plug-ins/ and run make from console inside this directory. After that experimental GEGL tools will be able to pick new operations.
When GIMP 2.8 is out, there will be two more types of shareable resources available: brush dynamics and named tools presets. But it’s a big separate story too, let’s not get carried away.
Conversion options
While lack of support for many available resource file formats such as e.g. ASE palettes in GIMP can be frustrating, the solution is very simple and free. SwatchBooker is a free application for Linux and Windows that allows editing color palettes with support for gradients and patterns coming in the next version.
SwatchBooker supports most file formats currently in use, including Adobe’s, Corel’s, Quark’s and Autodesk’s ones and saves GIMP palettes just fine. As already mentioned, the new version that is currently in development already supports both GIMP’s and Photoshop’s gradients and patterns.

The package includes two applications: SwatchBooker editor, which is for editing swatches, and SwatchBooker Batch Convertor (screenshot above), which is for, well, batch conversion.
Where to get add-ons
The ultimate source for scripts and plug-ins is GIMP Plugin Registry. It’s a community driven project, everyone is encoraged to share various add-ons.
Brushes, palettes, patterns etc. are scattered across the web. GIMPstuff.org attempts to fix it, but so far fonts and brushes are heavily dominating. A nice collection of brushes can be found in hawksmont’s blog. Other than that any big Photoshop related website will do.
Installation, best practices
The most common advice on installing add-ons in GIMP you get is in the lines of “OK, there is that folder… What was its name again… Oh! HIUQY%QGFPQE331!!TFUIHG. It’s easy, just try it!”.
As far as jokes go, this one is not so funny when you use another graphics editor that supports same add-ons. Which means you’d to have create a copy of your resources and keep it in sync.
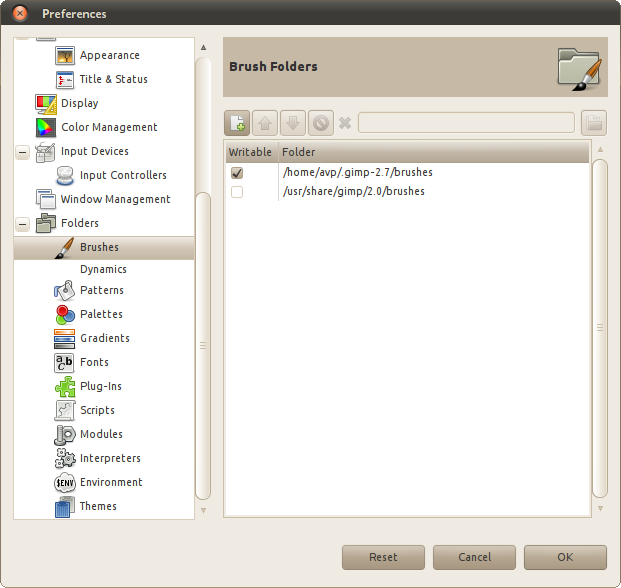
Instead I encourage you to choose Edit > Preferences menu item in GIMP and have a good look at the Folders group of tabs. Say, you opened it in the Brushes tab:
What you see here are locations where GIMP looks for existing brushes. The two default paths are a system folder that is accessible to all users of a system, and a local folder that is accessible only to system administrator and you (often the same person).
So if you absolutely want installing resources to a special GIMP’s folder, you don’t have to memorize its location: just click on the line with its name, which will appear above. You can select that text, copy it to clipboard and paste into address bar of either Explorer (Windows), Nautilus (UNIX, GNOME), Dolphin (UNIX, KDE) or use in Finder (Mac).
A better solution however is to keep resources (in this case — brushes) where you want to keep them (including local network, so you can access them from different computers) and just add the path to them. Which is very simple, here are the very few steps to do:
- Click the + button on the screenshot below to create a new location entry in the list, and then click the button with folder icon on it:

- Tell GIMP where your folder with custom brushes is:

- Now the Preferences dialog will list this new folder:

- After you click OK in the Preferences dialog, a warning will pop up to tell you that GIMP has to be restarted to take a newly added path into consideration:

After that you can simply add and remove resources in that folder, no need to go inside hidden folders. The very same procedure works for every single other kind of addons.
One more little thing. For some types of add-ons like brushes and gradients there is a column in the list that says “Writable”. What it means is that if the checkbox is on, GIMP will allow you to directly edit these resources. Otherwise you will be able to only duplicate a resource and edit that copy (it will automatically be put into default local GIMP’s folder, e.g. inside ~/.gimp-2.6 on Linux).
Updating list of add-ons
Requirement to restart GIMP to make it find new add-ons in already known folders depends on the kind of add-ons. For brushes, gradients, patterns, palettes and fonts you don’t need to restart GIMP: just click the circle arrow button in related dialog to make GIMP rescan folders for resources.

If you installed .scm scripts, you don’t have to restart GIMP either: use “Filters > Script-Fu > Refresh Scripts” to make GIMP rescan all folders for scripts. On newer computers it takes up to 10 seconds, on older it could be half a minute. This is also a handy feature for script developers, because you don’t need to restart the whole application just to try a tiny change in code.
However if you installed Python scripts (.py) or plug-ins, you will have to restart GIMP.
Locating new add-ons
For resources like brushes and palettes it’s obvious: you just look in the dialog where they are listed. For scripts and plug-in it’s a little less obvious, but still very, very simple: just use “Help > Plug-In Browser” command to open a dialog that makes it very easy to find out which menus has a newly added script of plug-in. The picture below explains it all really:

You switch to Tree View tab and start typing name of the script or plug-in. The list below updates as you type and displays tree of menu, so you get the idea where it is, and the right part of the dialog displays exact location. E.g.
The
Patreon subscribers get early access to my posts. If you are feeling generous, you can also make a one-time donation on BuyMeACoffee.