This article is an introduction to creating harmonic color schemes with Gpick, an advanced free color picker.
While working on a project I had to prototype a color palette. I’ve done my bit of color harmony research before, but when it comes to practical application of theory, what is it exactly that we’ve got among free graphics apps? Well, we’ve got Gpick.
Gpick looks a bit simplistic, but don’t let the first impression fool you: there’s a lot more that just a fancy color wheel. To get you started here is a short demo of most relevant features.
Color picker
Even though it looks like Gpick’s developer decided to implement half of Photoshop in a “while at that” fashion, everything still starts with the color picker which works very nicely, in a desktop-wide fashion, so you can pick colors from wherever your fancies take you :)
The picker is activated by clicking a button with an eye-drop icon in the lower right corner of the main window. When you move mouse (or stylus) cursor around, it will be closely followed by magnified representation of the area surrounding the current location of the mouse pointer:

Gpick can optionally take pixels surrounding the color picker’s cursor into consideration. There are two controls for that: the “Oversample” slider and the “Falloff” list.
“Oversample” is how many pixels around the mouse pointer are used to calculate the average color value, and “Falloff” controls how much these pixels influence the result depending on the distance from the center.
For example, if you want the selected amount of pixels around mouse pointer to affect the result equally, choose “None”. If you want the surrounding pixels maintaining their contribution to average value and then drop off at the farther end, choose “Cubic”.

When you pick a color, it gets automatically added to the list of colors and is given a name. The names are taken from two files, the first one being color palette by Resene Paints Ltd., the second one being X11 color palette (to the best of my knowledge).

Wheels of harmony
While RGB color wheel is the traditional color wheel used by graphic designers, Gpick additionally features two versions of RYB color wheel. Here is a comparison:

Well, RYB, as we very well know, today has rather historical than practical use, but it is still taught in art schools and as such is nice to keep around. The difference between the two versions of RYB is purely technical: the second implementation is a latter and more precise one; you can easily spot how much better blue hues are represented.

By default the little circle inside color wheel is locked, so that you don’t change lightness and/or saturation inadvertently (which leaves you S and L sliders to the right from the color wheel). You can fix that by right-clicking and disabling the “Lock” checkbox in the contextual menu.
At this point it’s worth mentioning that the user interface heavily relies on contextual (right-click) menus and drag’n’drop. Any color you see can be dragged and dropped anywhere in the application. Every color widget has a right-click menu where you can copy the value to clipboard in various notations: hex, RGB. HSL.
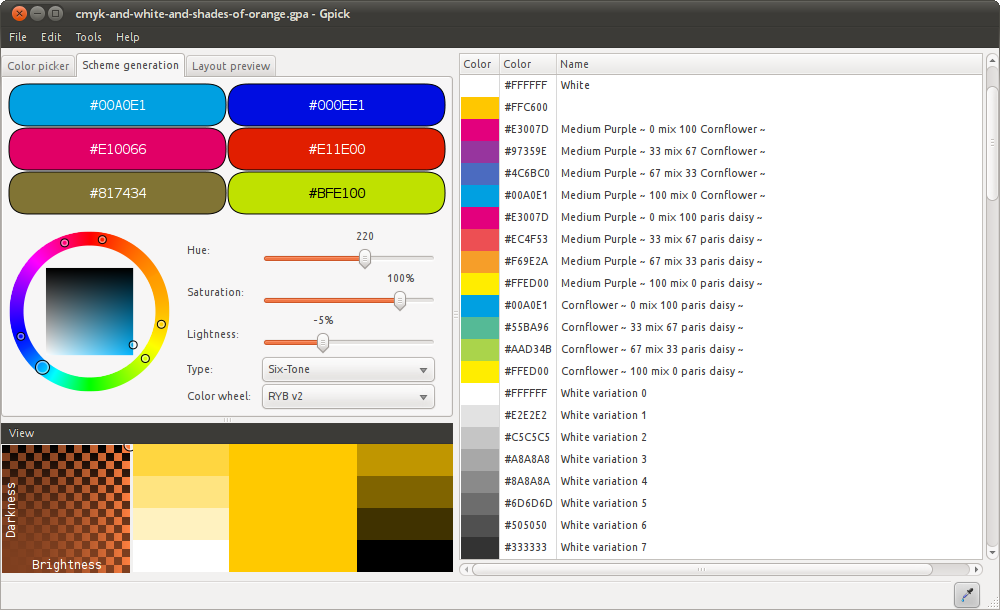
The “Type” list allows switching between 10 types of harmony building methods: complementary, analogous, triadic, split-complementary, tetradic, square, neutral, clash, five-tone and six-tone color. If you are new to this, for a really good reference I highly recommend an article by Iaroslav Lazunov called “Open the Door into the Science of Color Theory”. For more complicated explanation do have a go at “Color Wheels are wrong? How color vision actually works” by Jason Cohen.
Right now let’s just remember that there are two most used approaches to building harmonic schemes: relative positioning of hues on a color wheel according to one rule or another, and variation of one hue within a given lightness range.
When you rotate the hues, the color widgets above the selector get automatically updated:

If you like the generated scheme, you can drag all color to the colors list in the right side of the window, or just you contextual menu:

Generating variations
As soon as a color ends up in the favourites list, you get access to two functions for generating color variations. Both can be selected from right-click menu above a color.
The first one is called “Variations”, and you can use it for creating, well, variations of lightness and saturation within one hue:

It’s a very handy tool, because this way you can easily create achromatic (shades of gray) and monochrome (varying lightness) palettes in addition to palettes based around hues of same lightness and saturation.
Here you can define min and max lightness and saturation to create intermediate steps, as well as amount of steps. You can freely combine lightness and saturation variations in one go. When you click OK, all steps you created will be appended to the existing list of colors.
Contrary to “Variations”, the “Generate colors” dialog creates variations of hues, leaving saturation and lightness intact:

You can also define here amount of generated colors, but bear in mind that for types of color schemes with opposite (not adjacent) colors this will easily create repeating sequences of colors.
The last tool here, Mix Colors, allows creating intermediate shades for all selected colors in the palette. You can use as many base colors as you like, but the minimum amount of intermediate steps is three.

Testing and exporting
When you are done with your palette, there are several ways to go further.
First of all, you can test your palette live in Inkscape and GIMP: both of them understand and apply dropped colors. But whereas GIMP will fill either current selection or, in absence of selection, whole current layer with this color, Inkscape as a vector graphics editor is more flexible: it will refill only the object you dropped the color on.
Likewise Gpick accepts colors dragged from either Inkscape and GIMP and will use beginning color of a dropped gradient as well. We cooked up a video demonstration of that cool feature.
The second way to try the palette on is the built-in Layout Preview:

There are several layout presets, including a simplistic web page layout with menu which you can spot in the video. For each layout you can assign CSS selectors and save a CSS file that you can later use in production.
Finally, you can export your palette as GIMP palettes (.gpl), Adobe Swatch Exchange file (.ase) or Alias/WaveFront Material file (.mtl). For storing palettes a native binary file is used.
More color tools
So maybe you think — this is it? Color wheels and variations and CSS exporting? Not really. The main window has a bottom menu that is a bit like Blender’s internal window system: you can open other tools in same window.
Being able to open scheme generation window or layout preview window under either of the other two ones is probably not so compelling. But there are three more color tools for you to explore.
The first one is called “Darkness-Brightness”:

You have a base color, from which 8 shades are calculated based on position of small circle in the diagram to the left. Height of the circle controls contrast (gap between lightness values) of darker shades, and horizontal coordinate controls contrast of lighter shades. That way you can create e.g. very contrast lighter shades and barely distinguishable darker shades.
The second one is called “Variations”:

Just like the previous color tool, Variations creates four lighter and four darker shades of same hue in L channel of LAB color space. However in this case gaps between values of shade variations are controlled uniformly. THis is what the Strength slider is for.
And if LAB’s L channel doesn’t suffice, once again contextual menu for a base color comes to aid: you can switch to H, S or L channel from HSL color mode:

Finally we arrive to “Color mixer”:

The color mixer does a very simple thing: it takes three colors you can freely define and mixes each of them with a fourth color. The output goes to the right from the fourth color.
But even this simple feature has some advanced functionality. The word “Difference” that you see on the screenshot above is a name of a blending mode. Yes, you can actually switch between 7 blending modes via right-click menu and adjust opacity.
Other features
Yes, Gpick has even more features. Let me just name them:
- Generator of palettes from bitmap images (Tool > Palette From Image…);
- Configurable converters between color syntaxes (Edit > Edit Converters…);
- Importing and exporting of GIMP palettes (.gpl) and Adobe Swatch Exchange files (.ase).
With current version 0.2.3 someone’s bound to ask what is planned for the future. Well, I thought I could be that someone, so I went ahead and asked Albertas about his plans.
What he replied is that currently Gpick is not actively developed, but indeed there are some things planned, including CSS parser and color management support, and maybe even color deficiencies simulation.
Getting Gpick
If you are on Linux, you can download Gpick builds for Ubuntu or search for it among packages built for a distribution of your choice. As a last resort, you can build it from source code by running ‘$ scons" and ‘$ scons install’, the latter — with admin privilegies.
Windows user have also been taken care of, even though you need an existing GTK+ installation which usually comes with applications like GIMP and Pidgin. And besides the WIndows build hasn’t been updated since April 2010.
For Mac users things are more complicated, because Gpick is currently absent in both MacPorts, Fink and Homebrew. So you will probably have to install SCons along with GTK+ development files and still run it to build Gpick. On the other hand, Mac OS X is supposed to be packed with applications like that, so chances are that Mac users are extensively taken care of already.
Other apps
Gpick couldn’t possibly be the only open source application of that kind. Here is a quick overview.
Agave
Another color scheme application, Agave, is a comparatively simplistic color scheme generator for Linux ans UNIX systems. It has a basic sets of harmony schemes: Monochromatic, Analogous, Triads, Tetrads, Complements, Split-Complements.

There are three ways to get a color into Agave: selecting it from a predefined palette (using palette files stored in /usr/share/agave/palettes/ folder), picking a color with an eye-dropper (the color button to the left from the list of schemes) or dragging a color from swatches dialog in either Inkscape or GIMP.
Additionally you can lower and raise brightness and/or saturation of the base color via toolbar buttons, menu items or hotkeys. Only GIMP palette files can be exported.
The application hasn’t been updated since 2009, but works fine on modern systems even so. A while ago Fedora project published an extensive tutorial on Agave. Check it out, if you want more details.
What else? Some free design apps have built-in color harmony tools. Sadly, there are not many of them.
Scribus
This free desktop publishing application was first to implement a color harmony tool. What it has is an implementation of a color wheel with harmony presets: Monochromatic, Analogous, Complementary, Split Complementary, Triadic and Tetradic.

What makes Scribus special is that it lets you switching between normal vision and various types of color defects for preview. That switch also works for the main document window (it’s in the bottom right corner).
MyPaint
MyPaint is an excellent painting application for Linux, Windows and Mac that has an extensive support for graphic tablets such as Wacom Bamboo, Intuos and Cintiq.

Clicking on checkboxes brings up marks on the color wheel. Every kind of mark, i.e. square, rectangles, triangles pointing up or down, corresponds to a particular type of harmony.
GIMP? Inkscape?
Sadly, neither GIMP nor Inkscape have tools for exploring color harmony. The only related feature of GIMP is creating new palettes from gradients and images — a feature available from Paletes menu. For web design needs GIMP also has a CSS exporter of a color palette that you can access from same menu (“Export as > CSS stylesheet”).

Will any of the two major free graphics design applications get built-in color exploration tools? We’ll just have to wait and see.
Guest illustration by: Konstantin Rotkevich
Patreon subscribers get early access to my posts. If you are feeling generous, you can also make a one-time donation on BuyMeACoffee.